ASP.NET 4
ASP.NET 4
注意: 此教程已从官方删除
安装 TypeScript
如果你使用的 Visual Studio 版本还不支持 TypeScript, 你可以安装 Visual Studio 2015 或者 Visual Studio 2013。 这个快速上手指南使用的是 Visual Studio 2015。
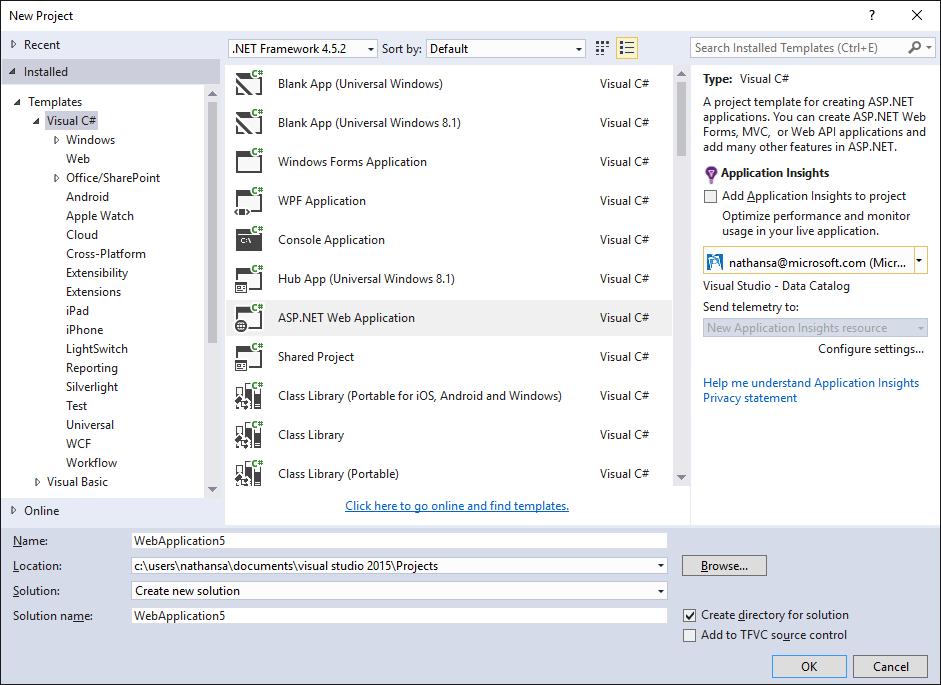
新建项目
-
选择 File
-
选择 New Project
-
选择 Visual C#
-
选择 ASP.NET Web Application
-
选择 MVC
取消复选 "Host in the cloud" 本指南将使用一个本地示例。

运行此应用以确保它能正常工作。
添加 TypeScript
下一步我们为 TypeScript 添加一个文件夹。
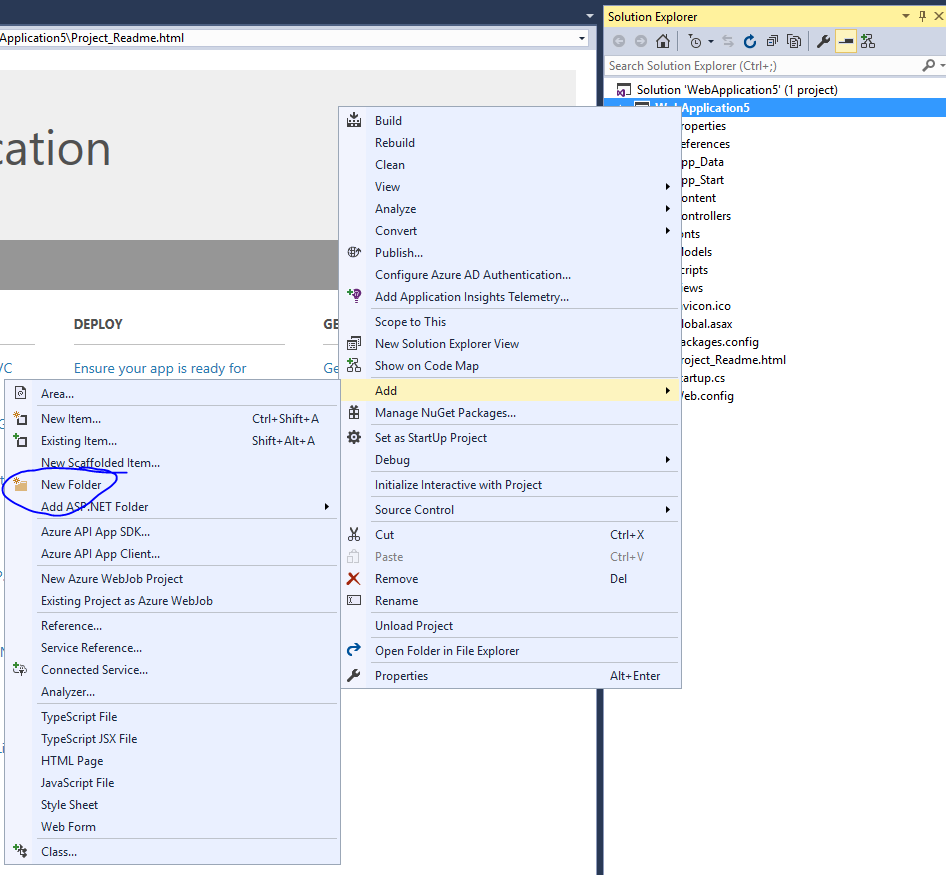
将文件夹命名为 src。

添加 TypeScript 代码
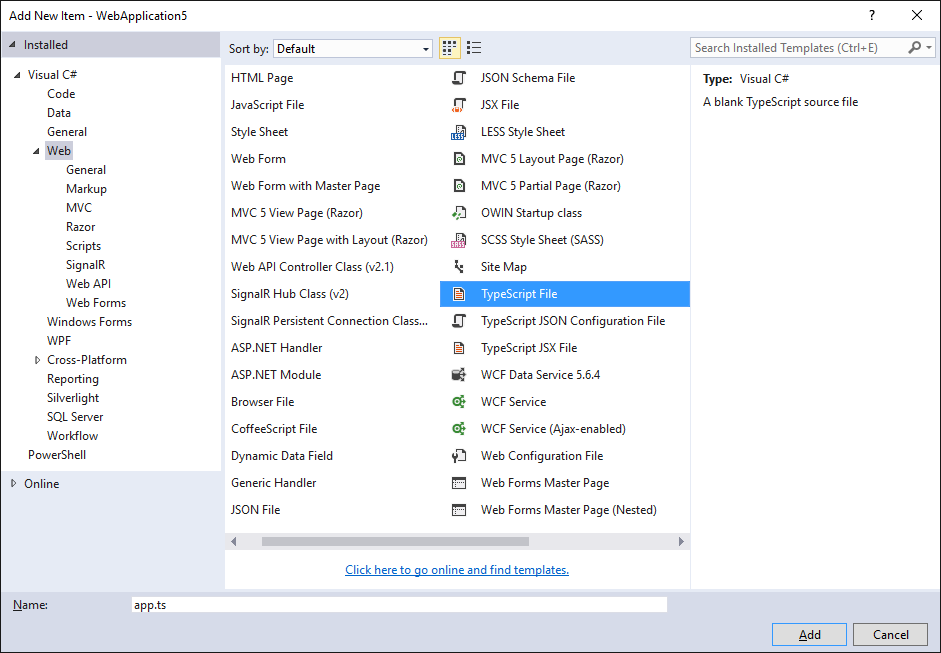
在 src 上右击并选择 New Item。 接着选择 TypeScript File 并将此文件命名为 app.ts。
添加示例代码
将以下代码写入 app.ts 文件。
function sayHello() {
  const compiler = (document.getElementById('compiler') as HTMLInputElement)
    .value;
  const framework = (document.getElementById('framework') as HTMLInputElement)
    .value;
  return `Hello from ${compiler} and ${framework}!`;
}
构建设置
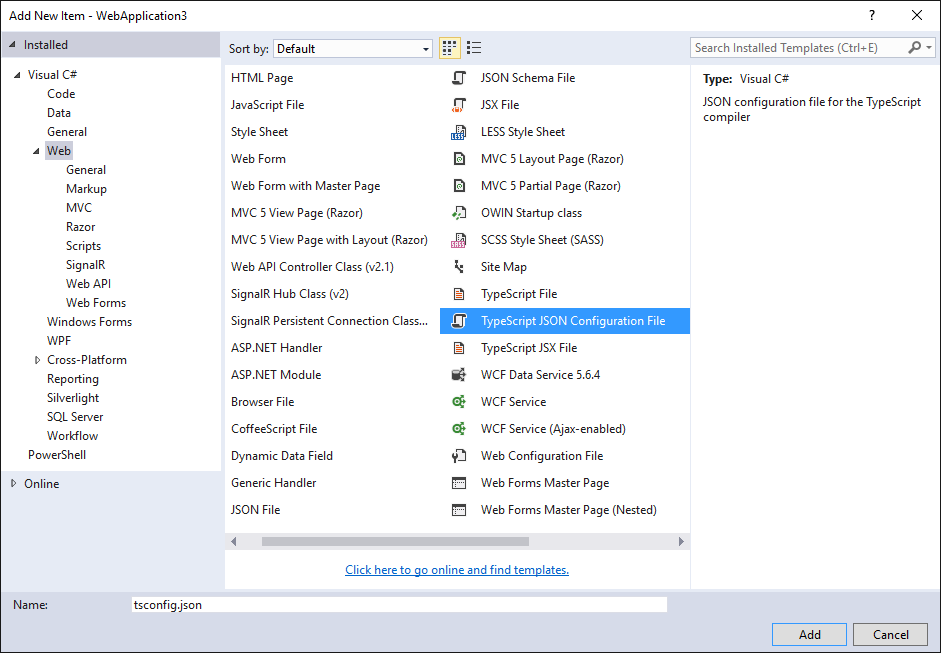
右击项目并选择 New Item。 接着选择 TypeScript Configuration File 保持文件的默认名字为 tsconfig.json。
将默认的 tsconfig.json 内容改为如下所示:
{
  "compilerOptions": {
    "noImplicitAny": true,
    "noEmitOnError": true,
    "sourceMap": true,
    "target": "es5",
    "outDir": "./Scripts/App"
  },
  "files": [
    "./src/app.ts",
  ],
  "compileOnSave": true
}
看起来和默认的设置差不多,但注意以下不同之处:
- 设置
"noImplicitAny": true。 - 特别是这里
"outDir": "./Scripts/App"。 - 显式列出了
"files"而不是依据"excludes"选项。 - 设置
"compileOnSave": true。
当你写新代码时,设置 "noImplicitAny" 选项是个好主意 — 这可以确保你不会错写任何新的类型。 设置 "compileOnSave" 选项可以确保你在运行 web 程序前自动编译保存变更后的代码。 更多信息请参见 the tsconfig.json documentation。
在视图中调用脚本
-
在 Solution Explorer 中, 打开 Views | Home |
Index.cshtml。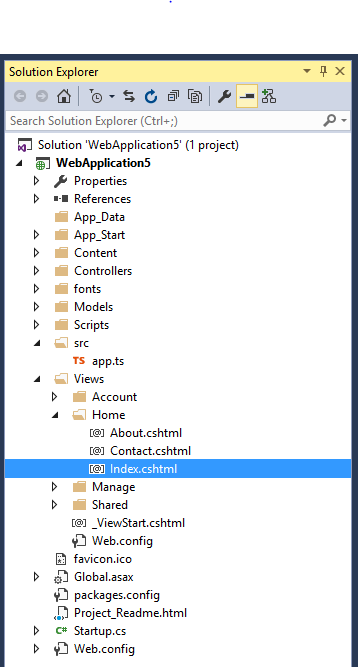
-
修改代码如下:
@{
    ViewBag.Title = "Home Page";
}
<script src="~/Scripts/App/app.js"></script>
<div id="message"></div>
<div>
    Compiler: <input id="compiler" value="TypeScript" onkeyup="document.getElementById('message').innerText = sayHello()" /><br />
    Framework: <input id="framework" value="ASP.NET" onkeyup="document.getElementById('message').innerText = sayHello()" />
</div>
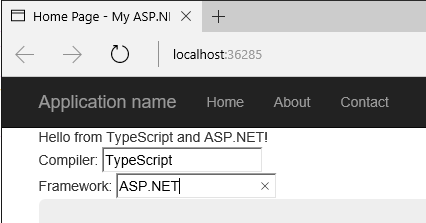
测试
- 运行项目。
- 在输入框中键入时,您应该看到一个消息:
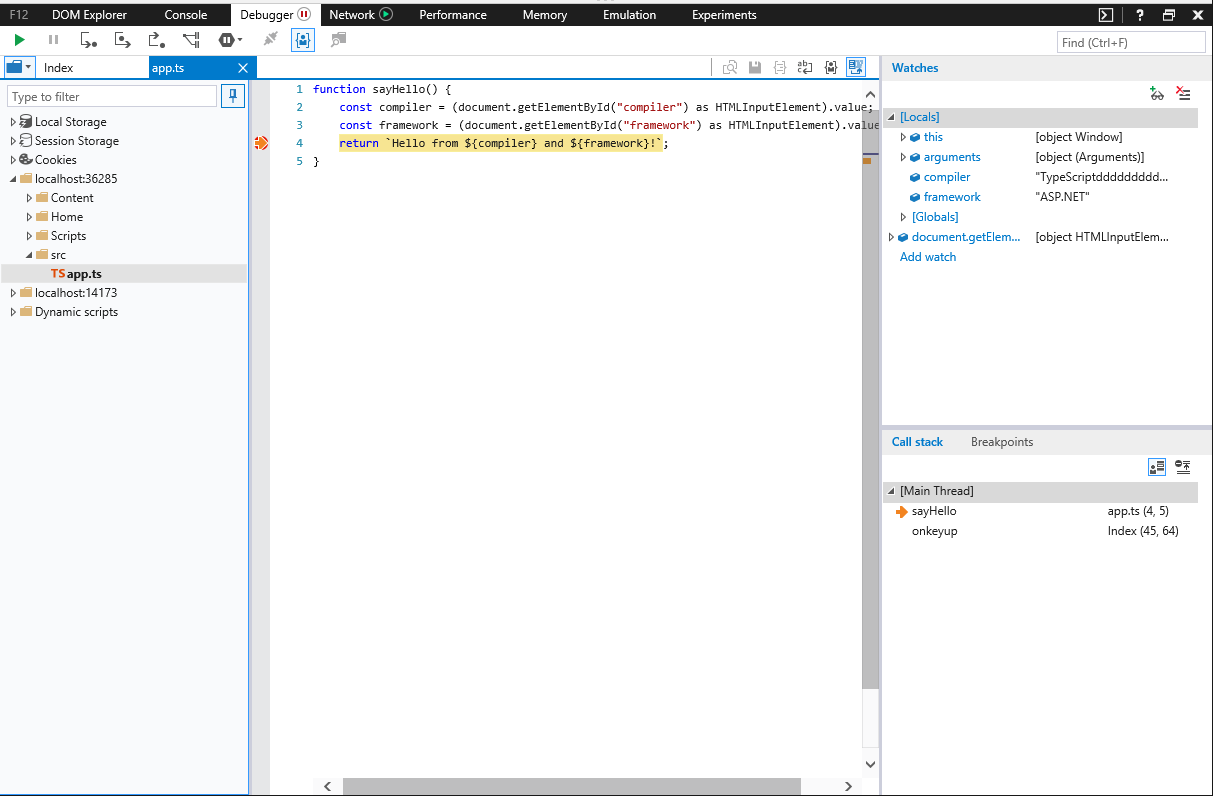
调试
- 在 Edge 浏览器中, 按 F12 键并选择 Debugger 标签页。
- 展开 localhost 列表, 选择 src/app.ts
- 在
return那一行上打一个断点。 - 在输入框中键入一些内容,确认 TypeScript 代码命中断点,观察它是否能正确地工作。
这就是你需要知道的在 ASP.NET 中使用 TypeScript 的基本知识了。接下来,我们引入 Angular,写一个简单的 Angular 程序示例。
添加 Angular 2
使用 NPM 下载所需的包
-
安装 PackageInstaller。
-
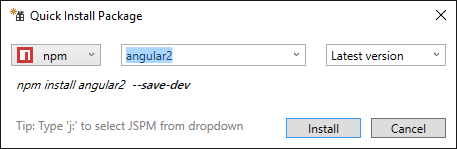
用 PackageInstaller 来安装 Angular 2, systemjs 和 Typings。
在 project 上右击, 选择 Quick Install Package。


-
用 PackageInstaller 安装 es6-shim 的类型文件。
Angular 2 包含 es6-shim 以提供 Promise 支持, 但 TypeScript 还需要它的类型文件。 在 PackageInstaller 中, 选择 Typing 替换 npm 选项。接着键入 "es6-shim":

更新 tsconfig.json
现在安装好了 Angular 2 及其依赖项, 我们还需要启用 TypeScript 中实验性的装饰器支持并且引入 es6-shim 的类型文件。 将来的版本中,装饰器和 ES6 选项将成为默认选项,我们就可以不做此设置了。 添加"experimentalDecorators": true, "emitDecoratorMetadata": true选项到"compilerOptions",再添加"./typings/index.d.ts"到"files"。 最后,我们要新建"./src/model.ts"文件,并且得把它加到"files"里。 现在tsconfig.json应该是这样:
{
  "compilerOptions": {
    "noImplicitAny": false,
    "noEmitOnError": true,
    "sourceMap": true,
    "target": "es5",
    "experimentalDecorators": true,
    "emitDecoratorMetadata": true,
    "outDir": "./Scripts/App"
  },
  "files": [
    "./src/app.ts",
    "./src/model.ts",
    "./src/main.ts",
    "./typings/index.d.ts"
  ]
}
添加 CopyFiles 到 build 中
最后,我们需要确保 Angular 文件作为 build 的一部分复制进来。这样操作,右击项目选择 'Unload' ,再次右击项目选择 'Edit csproj'。 在 TypeScript 配置项 PropertyGroup 之后,添加一个 ItemGroup 和 Target 配置项来复制 Angular 文件。
<ItemGroup>
  <NodeLib Include="$(MSBuildProjectDirectory)\node_modules\angular2\bundles\angular2.js"/>
  <NodeLib Include="$(MSBuildProjectDirectory)\node_modules\angular2\bundles\angular2-polyfills.js"/>
  <NodeLib Include="$(MSBuildProjectDirectory)\node_modules\systemjs\dist\system.src.js"/>
  <NodeLib Include="$(MSBuildProjectDirectory)\node_modules\rxjs\bundles\Rx.js"/>
</ItemGroup>
<Target Name="CopyFiles" BeforeTargets="Build">
  <Copy SourceFiles="@(NodeLib)" DestinationFolder="$(MSBuildProjectDirectory)\Scripts"/>
</Target>
现在,在工程上右击选择重新加载项目。 此时应当能在解决方案资源管理器(Solution Explorer)中看到node_modules。
用 TypeScript 写一个简单的 Angular 应用
首先,将 app.ts 改成:
import { Component } from 'angular2/core';
import { MyModel } from './model';

@Component({
  selector: `my-app`,
  template: `<div>Hello from {{ getCompiler() }}</div>`,
})
class MyApp {
  model = new MyModel();
  getCompiler() {
    return this.model.compiler;
  }
}
接着在 src 中添加 TypeScript 文件 model.ts:
export class MyModel {
  compiler = 'TypeScript';
}
再在 src 中添加 main.ts:
import { bootstrap } from 'angular2/platform/browser';
import { MyApp } from './app';
bootstrap(MyApp);
最后,将 Views/Home/Index.cshtml 改成:
@{
    ViewBag.Title = "Home Page";
}
<script src="~/Scripts/angular2-polyfills.js"></script>
<script src="~/Scripts/system.src.js"></script>
<script src="~/Scripts/rx.js"></script>
<script src="~/Scripts/angular2.js"></script>
<script>
    System.config({
        packages: {
            '/Scripts/App': {
                format: 'cjs',
                defaultExtension: 'js'
            }
        }
    });
    System.import('/Scripts/App/main').then(null, console.error.bind(console));
</script>
<my-app>Loading...</my-app>
这里加载了此应用。 运行 ASP.NET 应用,你应该能看到一个 div 显示 "Loading..." 紧接着更新成显示 "Hello from TypeScript"。